Starlink self-installation guide
Thank you for purchasing 2degrees Business Starlink - Let's get you started on the right foot.
Starlink has both IOS and Android applications. If you haven’t already, use the “Check for Obstructions” tool to find the best spot to set up your 2degrees Business Starlink. Your dish needs a clear view of the sky so it can continuously stay connected with satellites as they move overhead. Avoid setting up next to buildings or under trees.

2degrees will deliver your Starlink to your chosen address
- Connect cable to Starlink dish.
- Set Starlink into base or other mount you’ve purchased in the location found in step 1.
- Connect cables to power supply and router (if you’re using it) and plug into power.
- Starlink will automatically level itself (if you have purchased the fixed High Performance Starlink Kit) to search for satellites overhead. Do not attempt to manually adjust your Starlink.
- After a few minutes, Starlink will make an initial connection to the Starlink constellation and tilt to the optimum angle for satellite coverage.
If you have purchased an accessory or mount for your Starlink, you can find a guide on those here or search Starlink’s support here.
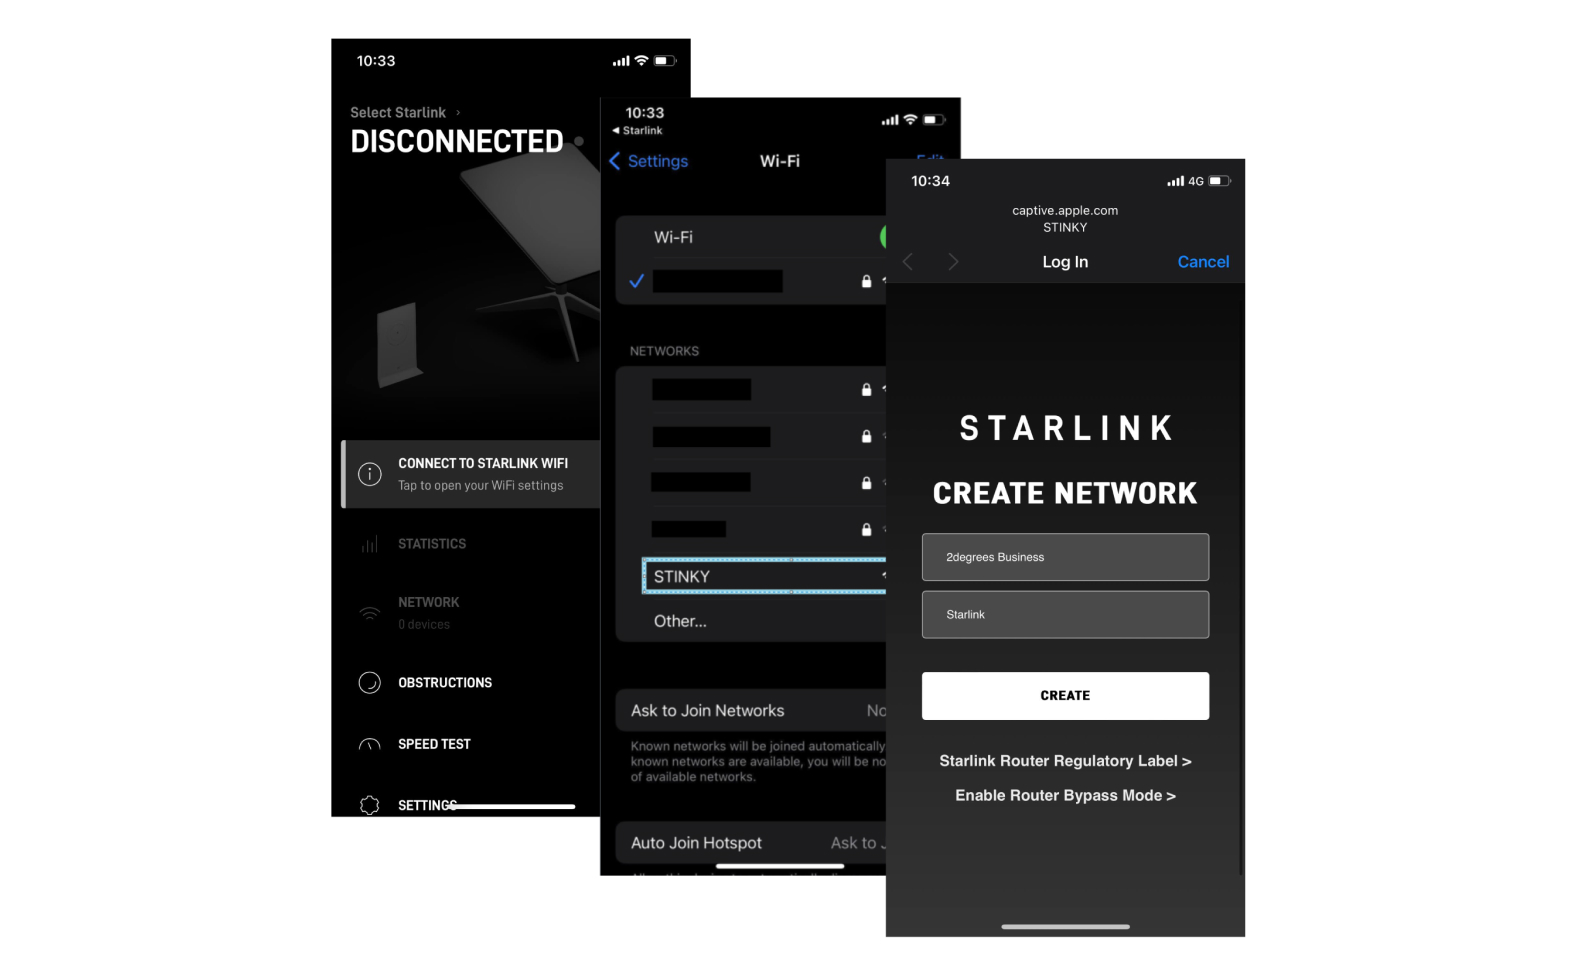
- Stand close to the router, open the Starlink app, and tap ‘Connect to Starlink Wi-Fi
- This will guide you through a brief setup and prompt with Wi-Fi configuration steps like setting a Network name and password.
- No Starlink app? Find and connect to the network called STARLINK or STINKY in your device’s Wi-Fi settings when the Wi-Fi router is on (the white light on the bottom of the router will be illuminated).
- Confirm you are connected by navigating to a website, watching a video, or running a speed test from the app while connected to Starlink. You will see an ONLINE status on the main screen of the app.
- Note - We recommend using the Starlink router for initial setup confirmation before plugging into a switch or customer equipment.
- You can reset your network name and password by following these steps if you need to (using the Starlink App):
- Power cycle (unplug from power and then plug back in) 6 times in a row on roughly a 2-3 second interval (about as fast as you can probably manage to plug and unplug it).
- The router will take a few minutes to reboot and will interrupt your service until you set up again. You can expect the light on the bottom of the router to be illuminated white when complete. There are no lights on the front of the router.
- Connect to “STARLINK” or “STINKY” in the list of available Wi-Fi connections on your device. This will prompt the above ‘Start Setup’ process again.

You can also get in contact with our Managed Networks team to assist with reconfiguring your Starlink Router or Network from the 2degrees Starlink account (see details below).
In our testing so far – 2degrees have discovered that it can take a small amount of time for the Starlink Router/Wi-Fi network to appear in a device’s settings. This is especially true where the Starlink App notes that the Router or Dish is updating. Please be patient, and if you’ve troubleshot your connection (checked all your cables, power and rebooted your Starlink kit) and it still isn’t showing up, please get in contact with our Managed Networks Team (contact details below).
If you’d like to test your connection after your install is complete, this can be done in two ways with the Starlink Wi-Fi Modem plugged in and connected to the Wi-Fi:
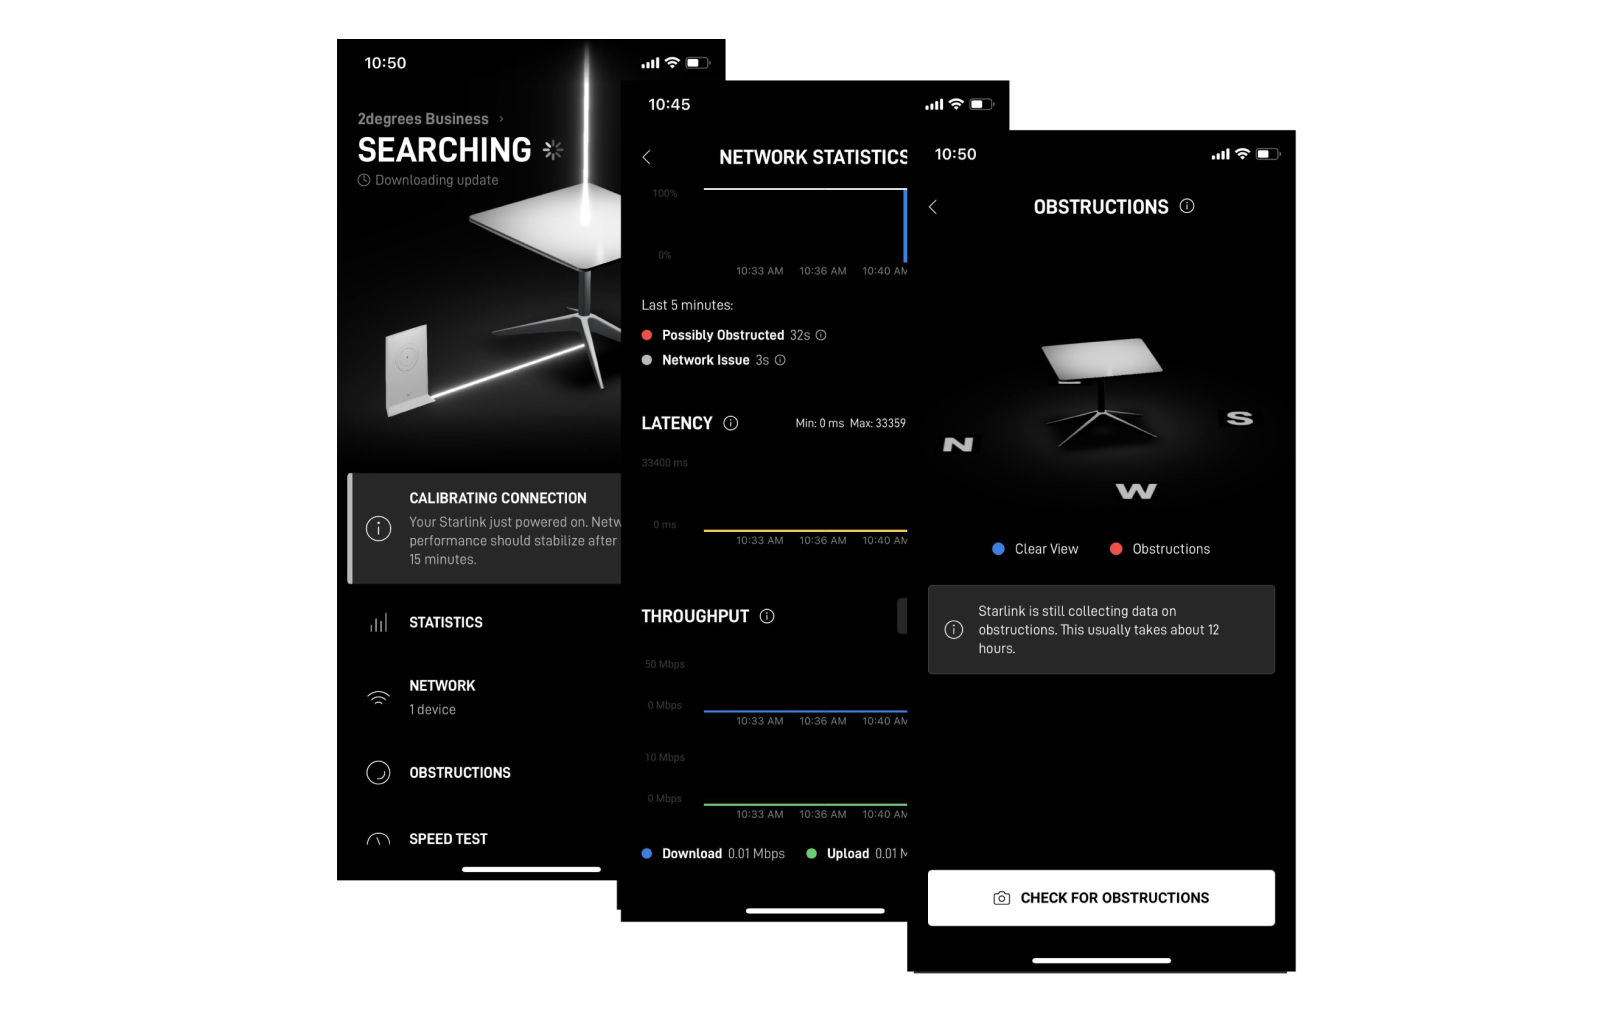
- Checking the Starlink app in the “Statistics” section;
- Typing dishy.Starlink.com into any web browser, where you can check statistics like speed, uptime, latency, outages, and alerts.
You won’t be able to log into ‘an account’ on the Starlink app, as 2degrees manages this for you, but the Starlink app will provide some features in app without logging in.

After a few hours of connection, the Starlink app has had time to collect more data:
- Obstructions: Check to see where you may have obstructions causing intermittent service.
If you need more assistance in your install, feel free to look through Starlink’s specification sheet with helpful links at the bottom for setup, support and more.
- High Performance Kit: https://www.starlink.com/specifications?spec=2
- Flat High-Performance Kit: https://www.starlink.com/specifications?spec=3
In all instances, 2degrees will be your point of contact for support with your Starlink kit. If you do encounter an issue during self-installation, please contact Managed Networks.
There is a 5-day period from delivery to set up and ensure that your device is working properly. If we have not been contacted within this period, we will assume that you are happy with your connection.
Starlink kits are backed by the manufacturer’s limited warranty from installation date of the service (RFS). To that end we recommend that the Customer retains all packaging materials for at least 12 months in case a return for evidence is required by 2degrees / Starlink.
Support and troubleshooting
- Search broadband articles in the Help section of our website at 2degrees.nz/help
- Our 100% NZ based Managed Networks support team is here to help
Safety Information
- Do not attempt to disassemble, repair, or modify the device.
- Do not use any other power supplies other than those recommended.
- Do not use the device where wireless devices are not allowed.
- Adapter should be installed near the equipment and should be easily accessible.
2degrees is an Authorised Reseller of Starlink.